
Want to get clients without typing their info later? That’s exactly what Dubsado’s lead capture forms can do for you.
Dubsado is a smart client management system that helps you run your business more smoothly. It handles everything from lead inquiries and contracts to payments and scheduling. But one of its best tools? The lead capture form. This simple form, when added to your website or shared as a link, does the hard work for you. When someone fills it out, Dubsado instantly creates a new client and project profile—no extra typing or manual entry needed.
In this guide, you’ll learn how to set up your own Dubsado lead capture form, step by step. We’ll also answer the big questions creatives like you often ask:
- What are lead capture forms?
- What is the most critical component of a successful lead capture form?
- How does lead capture work?
Let’s get into it because the faster you can capture leads, the sooner you can turn them into paying clients.
What Are Lead Capture Forms?
Lead capture forms are simple forms that help you collect important details from potential clients like their name, email address, and a little bit about what they’re looking for. Think of them as the front door to your business. Instead of playing email tag or sorting through DMs, you direct leads to a clean, clear form where they can introduce themselves and tell you what they need.
In Dubsado, lead capture forms do something extra powerful: when someone fills one out, it automatically creates a new client and a new project in your Dubsado account. No manual data entry. No copy-pasting. Just one form that keeps everything moving and organized behind the scenes. As soon as the form is submitted, that person goes from “stranger” to “potential client” with a full profile already set up in your system.
Why does this matter for photographers, designers, coaches, and other service-based businesses?
Simple. Your time is valuable. You don’t want to waste it sorting through messages or typing client info by hand. Lead capture forms save time, reduce errors, and help you stay professional. Plus, they let you ask the right questions from the start: What service are they looking for? When is their event? Where did they find you?
For creatives, this is even more essential. Your leads come from everywhere: Instagram, Pinterest, referrals, your website. A lead capture form brings all those inquiries into one place so you don’t miss anyone. And once the project is created, you can kick off automated workflows, like sending a welcome email or scheduling a discovery call.
In short, lead capture forms are your digital assistant. They collect, organize, and get your client journey started all before you even say hello. If you’re not using one yet, you’re probably doing too much manually!
How Does Dubsado Lead Capture Form Work?
When someone fills out your lead form, it sets off a chain reaction that saves you time, keeps you organized, and makes your business look incredibly professional.
Step 1: The form is filled out.
You can embed the form on your website or share it directly via link; whichever fits your process best. When a potential client lands on the form, they fill in key details like their name, email, project type, and any other custom questions you’ve added. This could include event dates, how they found you, or what services they’re interested in. You control the fields, so the form fits your business needs.
Step 2: Dubsado creates a new client and project automatically.
Once submitted, Dubsado does something magical: it instantly creates a new client profile and a matching project inside your account. No manual entry. No spreadsheets. This profile includes all the information they submitted, neatly stored in one place. You now have everything you need to start working with them or decide if they’re a good fit.
Step 3: A workflow can automatically begin.
Here is something I REALLY love about Dubsado. You can attach workflows to your lead capture form, which means that once it’s filled out, Dubsado can automatically start an onboarding sequence depending on the option your client choose. You can customize the workflow to match your services.
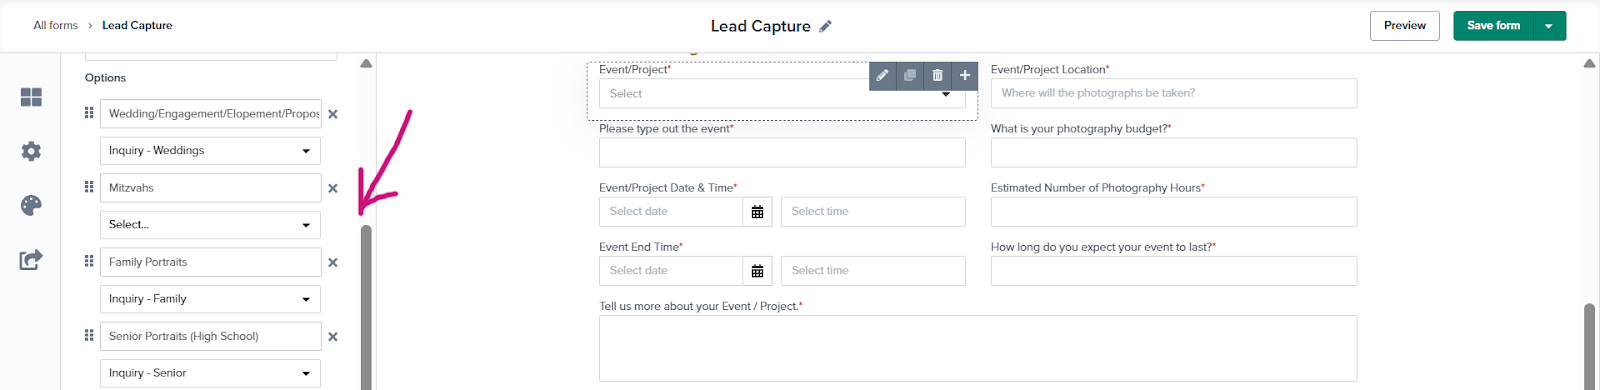
For instance, in this lead capture form, if a client selects Wedding/Engagement/Elopement/Proposal while filling the Event/Project field, an Inquiry – Weddings workflow would start immediately he/she submits the form. If the client selects Family Portraits, an Inquiry – Family workflow would start and if they select Senior Portraits (High School), an Inquiry – Senior workflow would automatically begin.
Bottom line? Dubsado’s lead capture forms don’t just collect information. They automate your entire intake process. From hello to booked, everything starts with that one form.
What Is the Most Critical Component of a Successful Lead Capture Form?
A successful Dubsado lead capture form is the front door to your business. And like any front door, it should be welcoming, easy to use, and give just enough information to know who’s knocking.
But what’s the most critical part of a form like this?
It’s clarity. A clear, simple, and well-structured form can be the difference between someone becoming a client or leaving your site without taking action.
Let’s break down what makes a lead capture form truly effective in Dubsado:
1. Required Fields That Matter: First Name, Last Name, Email
At the very least, you need the basics: first name, last name, and email address. These three fields should always be required. Why? Because they help you identify the lead, personalize your communication, and follow up. Without an email, you have no way to respond. Without a name, your follow-up loses a personal touch. These are the minimum details you need to start a conversation and Dubsado uses them to create a new client profile automatically.
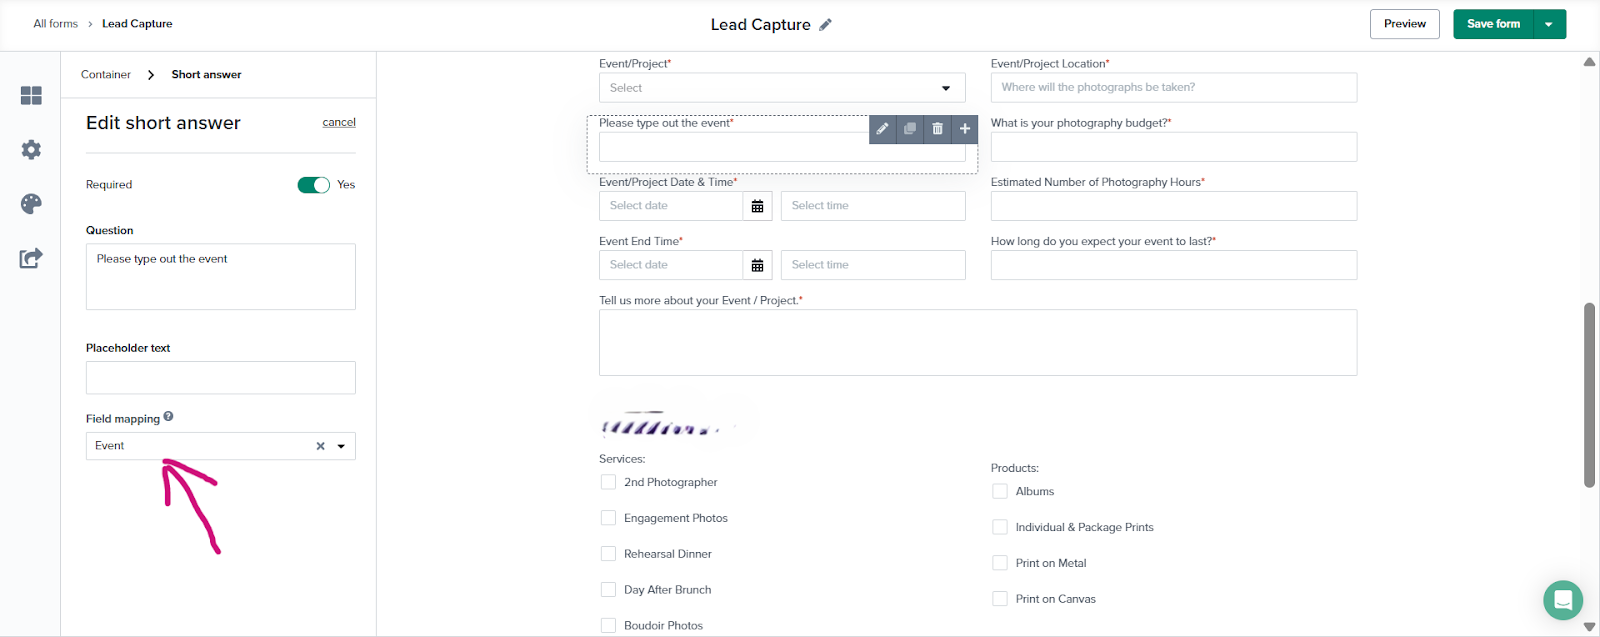
2. Field Mapping: Connecting the Dots Behind the Scenes
One of Dubsado’s superpowers is field mapping. This is where you tell Dubsado which answers should be stored in which places. For example, the form field for “Email” gets mapped to the email section in the client’s profile. “First Name” goes to the first name field, and so on. This keeps your client data organized and usable across the platform.
Let’s say you ask for “Event Date.” If mapped correctly, that date can trigger a workflow, populate a contract, or set deadlines automatically. Without field mapping, that info just floats in your form with no purpose.
3. Keep It Short and Clear
Resist the urge to ask everything upfront. A long form can feel overwhelming and scare leads away. Instead, only ask for what you really need at this early stage. Most leads haven’t spoken to you yet, they’re not ready to hand over their life story.
Stick to high-level, essential questions. Things like:
- What service are you looking for?
- How did you hear about us?
- When is your event?
- What is your budget for this project?
These questions help you qualify leads without making them feel like they’re applying for a loan. Save the deeper questions for later, after a discovery call or once they’ve booked.
4. If You Ask for Extra Info, Always Explain Why
Sometimes you may need more than the basics. That’s okay but explain why. Leads are more likely to give personal info when they understand the purpose.
Being transparent builds trust. When people don’t know why you need something, they hesitate or worse, abandon the form.
Step-by-Step: Build Your Dubsado Lead Capture Form
Setting up a lead capture form in Dubsado may sound techy, but it’s actually very simple especially once you understand each step. In just a few clicks, you can create a form that helps you collect client info, launch workflows, and make a great first impression.
Here’s exactly how to build your own lead capture form from start to finish:
Step 1: Go to Your Forms Library
From your Dubsado dashboard, look at the left sidebar. Click Templates, then select Forms.
You’ll see a few different types of forms here: Proposals, Contracts, Questionnaires, and Lead Captures. Each has a different job, but for now, we’re focused on lead captures.
Step 2: Create a New Lead Capture Form
Under the Lead Capture column, click the + button. This opens a brand-new form you can customize from scratch.
Start by giving your form a name. The title is just for you it helps you keep track of different forms if you use more than one. For example, you might name one “Branding Inquiry Form” and another “Wedding Photography Leads.”
Step 3: Add Key Fields and Map Them
The default smart fields in your Dubsado lead capture form include:
- First Name → {{client.firstName}}
- Last Name → {{client.lastName}}
- Email → {{client.email}}
- Phone → {{client.phone}} (optional, but explain why you’re asking!)
- Event Date → {{job.start | mediumDate}}
Step 4: Add Form Elements
You can now build the structure of your form by adding other fields. To do this, click the Elements tab on the left sidebar. From here, you can drag fields like:
- Short answer
- File Uploader
- Date select
- Dropdown
- Checkboxes
- Multiple choice
- Workflow
- Text blocks, etc
You can also click the + icon inside the form to add elements quickly.
When you add elements like Short answer or Date select from the form builder, you’ll have the option to map it to a smart field. This tells Dubsado where to store the data, so it shows up in the client profile, project settings, and any automated workflows you set.
Step 5: Set Form Settings
Now click the gear icon ⚙️ in the top right corner of the form. This is where you’ll set up how your form behaves after someone submits it.
Here’s what you can do:
- Assign a Default Workflow: You can connect your form to a workflow that automatically kicks off next steps. Note: If you use the Workflow form element (inside the form) to let leads select different services, that selection will override this default workflow. Use one or the other, not both, depending on how much flexibility you want.
- Add a Thank You Message: You can write a short message that appears after someone submits the form. Something friendly and warm like, “Thanks for reaching out! We’ll be in touch soon.”
- Set a Redirect URL: Want to send them to a thank-you page, a booking calendar, or a video after submitting? Paste the URL here, and they’ll be taken there automatically.
- Pick a Project Status: This helps you organize your leads by stage. For example, you could label new submissions as “New Inquiry” or “Needs Review.”
- Set a Project Title: This is the name that will appear on the project in Dubsado. You can use smart fields here too.
- Assign to a Team Member (if applicable): If you work with a team, you can auto-assign new leads to a specific user in your Dubsado account. This is helpful if you want someone managing all initial inquiries.
Share and test it
Once your form is ready, it’s time to share it. You can either embed the form on your website using the provided code or copy the public link to share via email, social media, or your link-in-bio.
Before you start sending it out, be sure to test the form yourself. Submit a sample entry to make sure it creates a new client and project in Dubsado. If you’ve attached a workflow, confirm that it starts automatically. Testing helps you catch any issues and ensures your form works exactly how you want it to.
Ready to Turn Curious Clicks into Booked Clients?
Start building your Dubsado lead capture form today and let your systems do the heavy lifting. This one step can transform how you handle new leads as a service provider.
💬 Got a question about setting it up? Drop it in the comments or reach out to me on Instagram, I’m happy to help! Need a workflow automation specialist to help you set it up? Kindly fill this form and I will get back to you.
👇 Let me know what service you’d use a Dubsado lead capture form for in the comments!
Related Blog Posts
What is Dubsado and How Can It Benefit Your Business?
Dubsado Pricing: Plans, Features, and Comparisons
Why Dubsado Automation Tool is What You’ve Been Missing